making Ball drawing machine(9월~10월 프로젝트, 구글 앱스토어 출시 완료)
[영상]
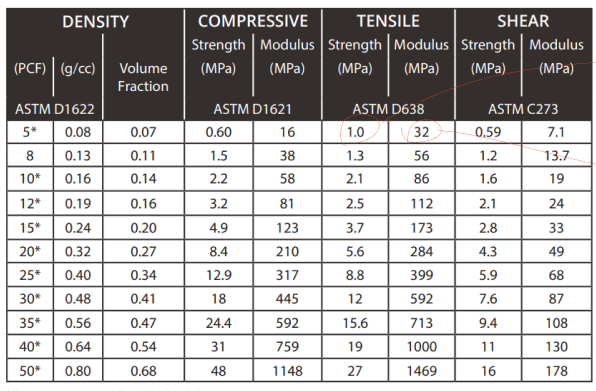
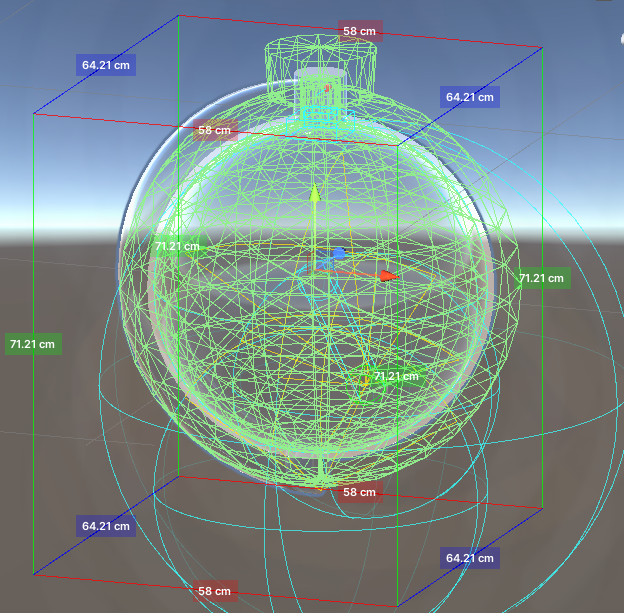
ball spec
밀도:8g/cc
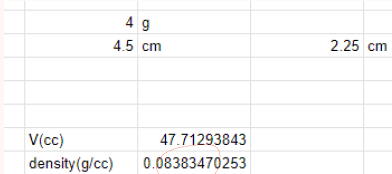
동일한 밀도를 가지는 폴리우레탄(PU)의 물성표 참조.
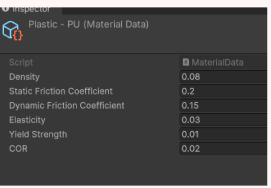
충돌과 관련된 physics material property
Wind flow mechanism

Texture
[영상]
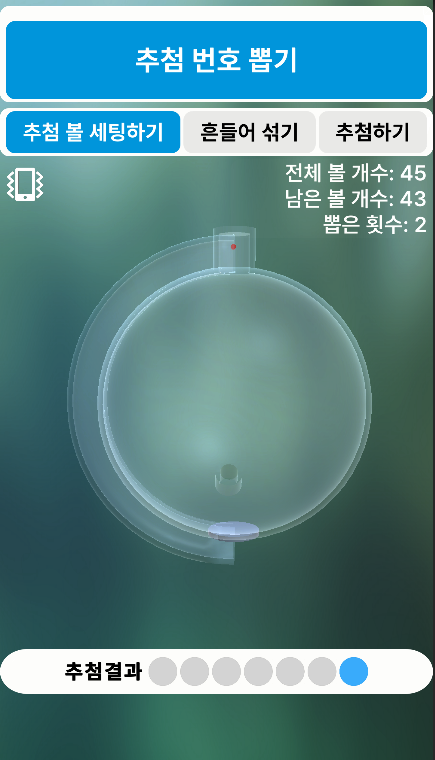
공 추첨 이벤트 발생 시 처리 https://youtu.be/rsb_jgA9YQ4
[영상]
출구 마개와 통로 추가, 추첨 애니메이션 보완
[영상]
UI 계획, 디자인
버튼 이벤트 매핑. https://youtu.be/NS3JHKrpLAo
[영상]
Playerpref 세이브 https://youtu.be/dGgynsj67Mw
[영상]
Drawn number's UI 업데이트 https://youtu.be/LOmJ7G8PeMo
[영상]
adding status UI for showing number of current balls. adding system toggle. deleting history toggle. https://youtu.be/xKvxPj02LEs
[영상]
(업데이트 중)
아래는 기록과 참조용으로 남기는 스크립트 리스트. 그리고 프리팹 폴더에는 메시와 센서말고는 없다.
프로그램이 간단해보이는데 의외로 코드가 많은 것 같이 느껴질 수 있다. 코드가 많은 이유는 내가 객체지향형 프로그래밍과 모듈화의 재미에 빠져서 코드를 늘렸기 때문이다. 물론 필요에 의해 만든 것도 경우도 있다. 한 예로 wrapper 클래스는 서드파티 센서 자산을 나의 namespace로 불러와서 쓰기 위해 wrapping을 했다. sensorbase 클래스는 airsensor와 detectsensor가 사실은 같은 센서에서 출발했고 내가 사용하는 용도만 다를 뿐이기 때문에 분화가 가능하도록 base클래스를 만들고 공통된 기능은 base에 넣고 이를 상속하는 클래스에서는 override를 하도록 했다.
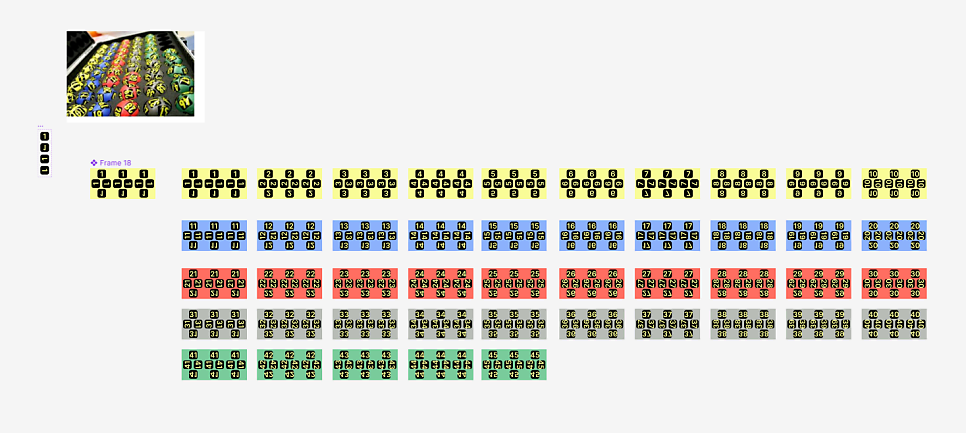
Ball이 45개나 되기 때문에 entity라는 것을 잘 모르지만 흉내내려고 시도해보았었다. entity를 상속받는 클래스는 ball클래스밖에 없어서 효용이 없고 흉내를 제대로 못낸거 같아서 별로 혜택은 못 본거 같긴 하다. ball이 45개나 되기 때문에 ball 클래스에서는 되도록 참조를 많이 넣지 않았다. 이를 위해서 모든 ball의 인스턴스화를 담당하는 중앙의 ballmanager에서 그러한 참조들을 한 번만 넣고, ball에 꼭 필요한 변수들을 뽑아 ball에 넘겨주었다.
각각의 ball에는 static enum들로 저장되어 있는 각 센서ID에 detect 감지여부에 따라 물리적 영향을 받도록 했다. 각 센서들이 ball을 감지하는 지의 여부는 2개의 각각 airSensorManager와 detectSensorManager가 담당한다. 센서들이 탐지 결과를 static enum에 저장하면 각각의 ball은 enum에 접근해 어떤 센서가 자신을 탐지했는지 확인한다.
45개의 ball들과 7개의 sensor들 간의 커넥션 수는 자칫하면 반복적으로 서로 참조하여 많은 경우의 수가 될 수가 있기 때문에 사이에 오고가는 데이터를 static으로 만들어준 것이다. 그러나 이것이 효과가 얼마나 있었는지 모르고, 꼭 이래야 할 필요가 있는 것 같지는 않다.
manager들 중에 datamanager만 static singleton으로 두었음. 심지어 최고 단에 위치하는 programmanager도 static으로 두지 않았는데, 이건 설계 미스였음. programmanager와 마찬가지로 airsensormanager, detectsensormanager, 기타 controller 등도 싱글톤을 하지 않았음. 싱글톤을 지양하도록 만들었는데, programmanager는 singleton으로 두고 어디서나 쉽게 불러올수 있게 했다면 더 깔끔했을 것 같음.
중앙집권화되어 한 개의 스크립트에 너무 많은 기능이 들어가고 참조가 들어가는 것이 싫었기 때문에 싱글톤을 지양한 것이었음. 따라서 싱글톤이 아닌 programmanager에 기능을 몰아서 넣지 않고 하위 매니저에 기능을 분산하고, 매니저의 코드와 에디터 모두 시각적으로 지저분한게 싫었기 때문에, 참조도 inspector 상에서 지정하거나 코드상에서 gameobject를 찾는 것 등을 지양했음. 그래서 사용한 방법은 static enum 클래스를 만들고 활용하였음. 데이터 링크가 필요할 경우는 되도록 오브젝트 전체를 불러오지 않도록 하고 static 클래스 데이터를 사용한 것임.
1
2
3
4
5
6
7
8
9
10
11
12
13
14
15
16
17
18
19
20
21
22
23
24
25
26
27
28
29
30
31
32
33
34
35
36
37
38
39
40
41
42
43
44
45
46
47
48
49
50
51
52
53
54
namespace QUIRKAGAMES.Lottery
{
    public class Enums
    {
        // Create a new enum for ball names from B1 to B45
        public enum BallName
        {
            B01, B02, B03, B04, B05, B06, B07, B08, B09, B10,
            B11, B12, B13, B14, B15, B16, B17, B18, B19, B20,
            B21, B22, B23, B24, B25, B26, B27, B28, B29, B30,
            B31, B32, B33, B34, B35, B36, B37, B38, B39, B40,
            B41, B42, B43, B44, B45

        }

        public enum SensorIDEnum
        {
            [SensorType(SensorTypeEnum.Air)]
            AirSensor_gravity,
            [SensorType(SensorTypeEnum.Air)]
            AirSensor_bottom_upflow,
            [SensorType(SensorTypeEnum.Air)]
            AirSensor_inlet_Los_small,
            [SensorType(SensorTypeEnum.Air)]
            AirSensor_inlet_Los_large,
            [SensorType(SensorTypeEnum.Air)]
            AirSensor_inlet_Ray,
            [SensorType(SensorTypeEnum.Detect)]
            DetectSensor_outlet,
            [SensorType(SensorTypeEnum.Air)]
            AirSensor_outlet_hold,
            [SensorType(SensorTypeEnum.Air)]
            AirSensor_outlet_Block,

        }

        public enum SensorTypeEnum
        {
            Air,
            Detect
        }

        // Define an enum to represent the ball's movement state
        public enum BallMovementState
        {
            NotMoving,      // The ball is not moving
            MovingAlongCurve, // The ball is moving along the custom curve
        }

    }
}
아래는 스펙 클래스. static은 아니다. 생각나고 필요할 때마다 클래스를 만들고 분화시켰기 때문에 다음 프로젝트를 할 때는 경험을 토대로 좀더 예쁘게 정리할 수는 있었을 거 같다.
1
2
3
4
5
6
7
8
9
10
11
12
13
14
15
16
17
18
19
20
21
22
23
24
25
26
27
28
29
30
31
32
33
34
35
36
37
38
39
using System.Collections.Generic;
using UnityEngine;

namespace QUIRKAGAMES.Lottery
{
    public class Specs
    {
        // Define a public static field to store the inlet position
        public static Vector3 inlet_Pos = new Vector3(0, -20, 20);

        // Create a custom class to store force data
        public class SensorForceData
        {
            public float magnitude;
            public Vector3 direction;

            public SensorForceData(float magnitude, Vector3 direction)
            {
                this.magnitude = magnitude;
                this.direction = direction;
            }
        }

        // Create a dictionary to map each SensorIDEnum to its corresponding force data
        public static Dictionary SensorForceMap =
            new Dictionary
            {
                { Enums.SensorIDEnum.AirSensor_gravity, new SensorForceData(0f, Vector3.down) }, // 9.81f
                { Enums.SensorIDEnum.AirSensor_bottom_upflow, new SensorForceData(0f, Vector3.up) }, // 20.81f
                { Enums.SensorIDEnum.AirSensor_inlet_Los_small, new SensorForceData(0f, Vector3.zero) }, // 15.0f
                { Enums.SensorIDEnum.AirSensor_inlet_Los_large, new SensorForceData(0f, Vector3.zero) }, // 25.0f
                { Enums.SensorIDEnum.AirSensor_inlet_Ray, new SensorForceData(0f, Vector3.zero) }, // 18.0f
                { Enums.SensorIDEnum.AirSensor_outlet_hold, new SensorForceData(0f, Vector3.up)},  // 3f
                { Enums.SensorIDEnum.AirSensor_outlet_Block, new SensorForceData(0f, Vector3.down)},  // 10f

                // Add more force values as needed
            };
    }
}
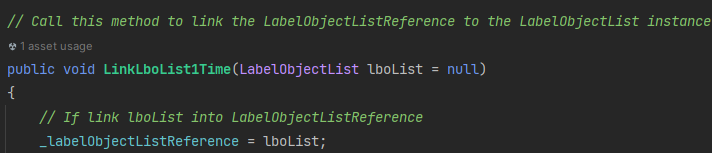
UI 이벤트를 연결할 때는 클릭이벤트에 프로그램매니저를 참조하여 프로그램매니저에 있는 객체와 UI에 있는 script를 링크해주었음. 따라서 프로그램 매니저의 초기화 코드에는 UI 오브젝트들을 직접 찾는 코드가 없음. 다시 말하지만, 여기서 프로그램매니저를 다른 곳에서 많이 참조하기 때문에 프로그램매니저를 static으로 만들면 좋았을 것이라는 결론임. (다음 번 부터는 그렇게 할 것.)
아래는 UI에서 직접 이벤트로 programmanger에 자신의 스크립트를 참조시킴.

programmanager에서는 받은 객체를 자신의 레퍼런스 변수에 링크해둔다. UI 에 업데이트를 명령할 때면 그렇게 저장해둔 레퍼런스 객체를 호출하면 된다.
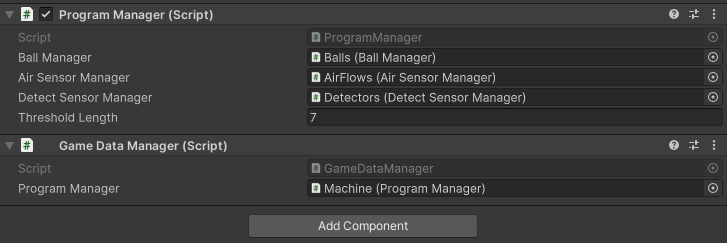
아래는 상대적으로 간소한 프로그램매니저 인스펙터.
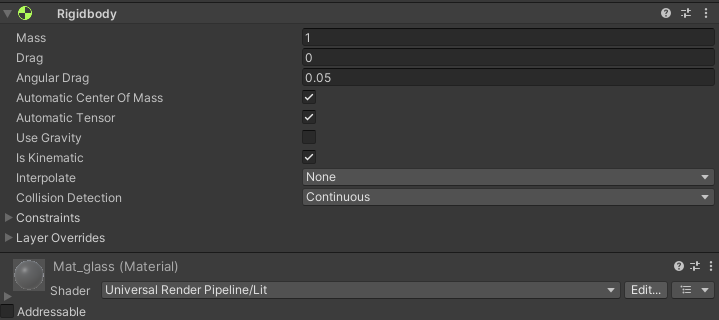
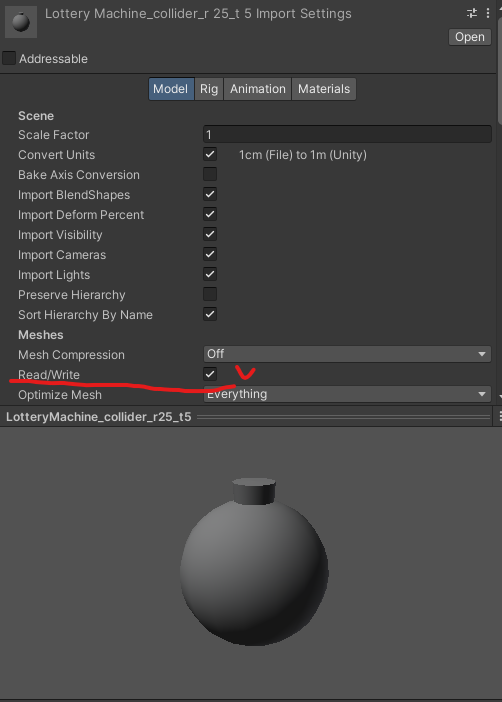
유니티의 충돌이벤트는 오차가 많다. 그래서 공이 그대로 컨테이너(벽)을 뚫어버리는 경우가 많다. 그래서 ball과 container의 rigidbody는 continuous로 꼭 설정해주어야 한다. 빠른 물체 충돌에 대해선 contiuous
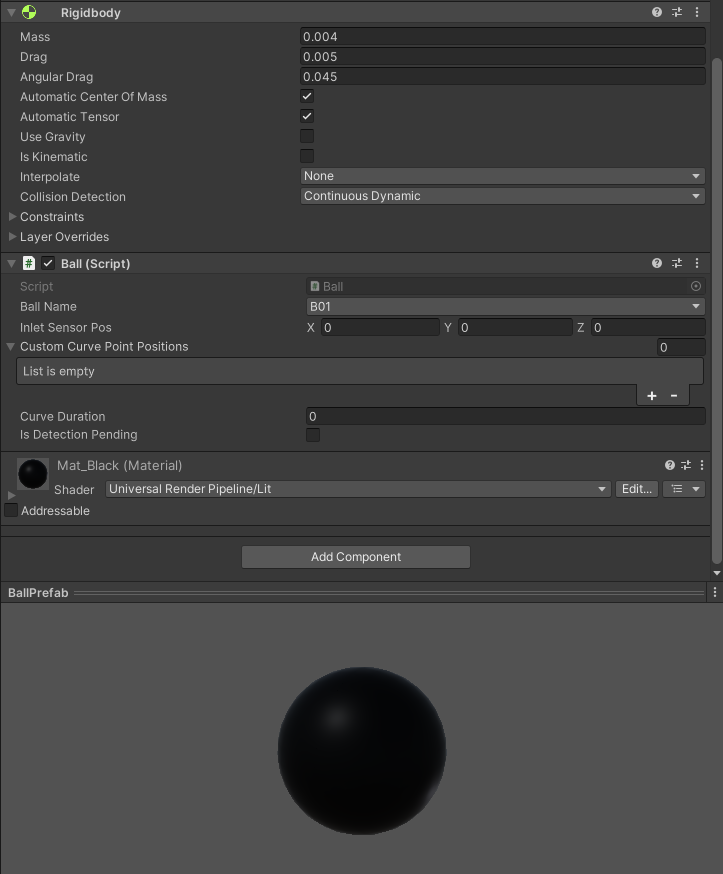
여담이지만, 이래도 충돌이 안일어난다면 collision mesh에 read/write를 true로 설정했는지 확인하고 설정해주면 된다. 디폴트는 false였기 때문이다.
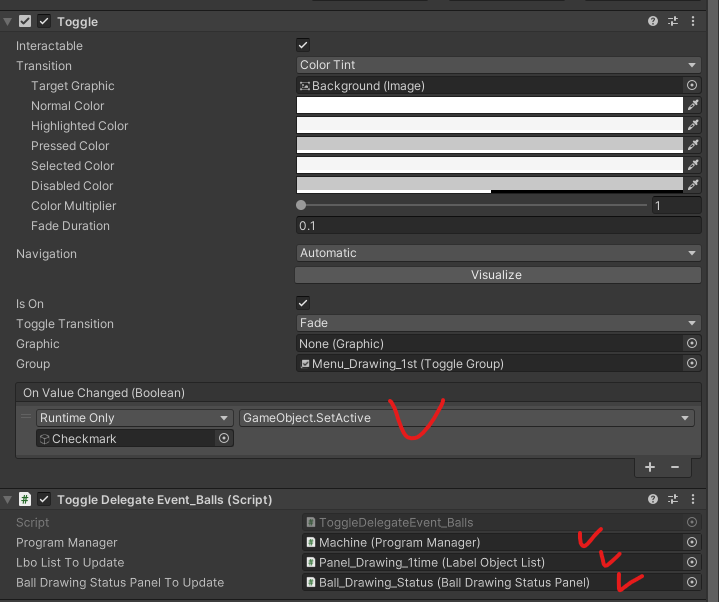
Toggle 버튼의 OnchangedEvent는 toggle의 isOn 이 False가 될 때에도 호출되는 것을 발견했다. 나는 버튼으로 치면 OnClickedEvent를 쓰고 싶었기 때문에 새로 만들어서 사용했다.
1
2
3
4
5
6
7
8
9
10
11
12
13
14
15
16
17
18
19
20
21
22
23
24
25
26
27
28
29
30
31
32
33
34
35
36
37
38
39
40
41
42
43
44
45
46
47
48
49
50
51
52
53
54
55
56
using System.Collections;
using UnityEngine;
using UnityEngine.Serialization;
using UnityEngine.UI;

namespace QUIRKAGAMES.Lottery
{
    public class ToggleDelegateEvent_Balls : ToggleDelegateEventBase
    {
        public ProgramManager programManager;
        public LabelObjectList lboListToUpdate;
        public BallDrawingStatusPanel ballDrawingStatusPanelToUpdate;

        protected override void Awake()
        {
            // Fetch the Toggle GameObject
            _mToggle = GetComponent();
            // Add listener for when the state of the Toggle changes, to take action
            _mToggle.onValueChanged.AddListener(delegate {
                ToggleValueChanged(_mToggle);
            });
        }

        //Output the new state of the Toggle into Text
        protected override void ToggleValueChanged(Toggle change)
        {
            if (_mToggle.isOn)
            {
                StartCoroutine(WaitForCondition());
            }
        }

        private IEnumerator WaitForCondition()
        {
            // Keep checking the condition until it becomes true
            while (!RequiredFunction())
            {
                yield return null; // Wait for the next frame
            }

            // The condition is now true, continue with the next lines of code
            Debug.Log("Condition is true!");

            // Add your code here to run after the condition becomes true
            programManager.LinkLboList1Time(lboListToUpdate);
            ballDrawingStatusPanelToUpdate.UpdateStatus();
        }

        private bool RequiredFunction()
        {
            // Add your condition here
            return programManager.SetBalls();;
        }

    }
}
이제 기본 Toggle의 OnValueChanged에는 checkmark가 생기고 없어지고를 쓰는 이벤트 1개만 넣어주고, 클릭될 때만 호출되어야 하는 것은 새로 만든 스크립트에 이벤트로 구독했다.
(body)OrbitCameraController, (top-left)variable Icons connected to “SystemInfo.supportsAccelerometer” ,(toggle button)prevent duplicated event, URP Renderer, Desktop Version & Mobile Version https://youtu.be/9Xi7cP6FqbA
[영상]
기기의 가속도 센서 움직임에 따라 내부의 공을 흔들어 섞어주는 기능을 넣기로 함.
1
2
3
4
5
6
7
8
9
10
11
12
13
14
15
16
17
18
19
20
21
22
23
24
25
26
27
28
29
30
31
32
33
34
35
36
37
38
39
40
41
42
43
44
45
46
47
48
49
50
51
52
53
54
55
56
57
58
59
60
61
62
63
64
65
66
67
68
69
70
71
72
73
74
75
76
77
78
79
80
81
82
83
84
85
86
87
using UnityEngine;
using System.Collections.Generic;
using UnityEngine.Serialization;

namespace QUIRKAGAMES.Lottery
{
    public class AccelerometerShakeDetection : MonoBehaviour
    {
        private readonly float _shakeThreshold = 1.3f; // Adjust this threshold to control sensitivity
        private Vector3 _deviceAcceleration;
        private List _originalPositions = new List(); // Store original positions of objects
        private List _currentPositions = new List(); // Store current positions of objects
        public GameObject iconShakeO;
        public GameObject iconShakeX;
        public Transform[] objectsToShake; // Add your game objects here

        // Adjust the fixed update rate by changing the time interval
        private float fixedUpdateInterval = 0.05f; // Change this value to your desired time interval
        private float timeSinceLastFixedUpdate = 0.0f;

        // Static variable to store the magnitude
        public static Vector3 deviceAcceleration { get; private set; }

        private void Start()
        {
            // Check if the device supports accelerometer input
            if (SystemInfo.supportsAccelerometer)
            {
                // Enable the accelerometer
                iconShakeO.SetActive(true);
                iconShakeX.SetActive(false);

            }
            else
            {
                // Accelerometer input is not supported on this device
                Debug.LogWarning("Accelerometer not supported on this device.");
                iconShakeO.SetActive(false);
                iconShakeX.SetActive(true);
            }
        }

        private void FixedUpdate()
        {
            // Update the time since the last FixedUpdate
            timeSinceLastFixedUpdate += Time.fixedDeltaTime;

            // Check if it's time to run FixedUpdate based on the desired interval
            if (timeSinceLastFixedUpdate >= fixedUpdateInterval)
            {
                // Call FixedUpdate
                SlowFixedUpdate();

                // Reset the time since the last FixedUpdate
                timeSinceLastFixedUpdate = 0.0f;
            }
        }

        private void SlowFixedUpdate()
        {
            // Check if the device supports accelerometer input
            if (SystemInfo.supportsAccelerometer)
            {
                // Get the current device acceleration
                _deviceAcceleration = Input.acceleration;
                // Calculate the magnitude of the acceleration vector
                float accelerationMagnitude = _deviceAcceleration.magnitude;

                deviceAcceleration = Vector3.zero;

                // Check if the magnitude exceeds the shake threshold
                if (accelerationMagnitude > _shakeThreshold)
                {
                    // Calculate the sensor-based force to apply to objects based on device acceleration
                    var sensorForce = _deviceAcceleration * Time.fixedDeltaTime;
                    Debug.Log("force: " + sensorForce);
                    deviceAcceleration = _deviceAcceleration * 9.0f;

                    // You might want to perform some action when a shake is detected,
                    // like playing a sound, triggering an event, or any other desired behavior.
                    Debug.Log("Magnitude: " + accelerationMagnitude);
                }
            }
        }
    }
}
slowupdate함수를 넣어서 기존 fixedupdate가 1초당 50번 업데이트를 하는 것과 달리 조절할 수가 있다. 0.05초 당 한 번 업데이트를 하기로 했으므로 1초당 20번 업데이트를 하도록 하였다. 힘을 가하는 것은 Ball에서 한다.
1
2
3
4
5
6
7
8
9
10
11
12
13
14
15
16
17
18
19
20
21
22
23
24
25
26
27
28
29
30
31
        private void FixedUpdate()
        {
            // apply AccelerometerShakeDetection.deviceAcceleration
            _acceleration += AccelerometerShakeDetection.deviceAcceleration;

            // Other Forces ...

            // Apply the acceleration to the ball
            ApplyAcceleration(_acceleration);
        }

        // Method to apply acceleration to the ball's Rigidbody
        public void ApplyAcceleration(Vector3 acceleration)
        {
            // Ensure the Rigidbody component is not null
            if (_rb != null)
            {
                // Calculate the new velocity based on the acceleration
                Vector3 newVelocity = _rb.velocity + acceleration * Time.fixedDeltaTime;

                // Update the Rigidbody's velocity
                _rb.velocity = newVelocity;

                // Update the currentAcceleration field
                _currentAcceleration = acceleration;
            }
            else
            {
                Debug.Log("Rigidbody is null");
            }
        }
Mobile Device Test https://youtu.be/R5SAfXpbj0k
[영상]
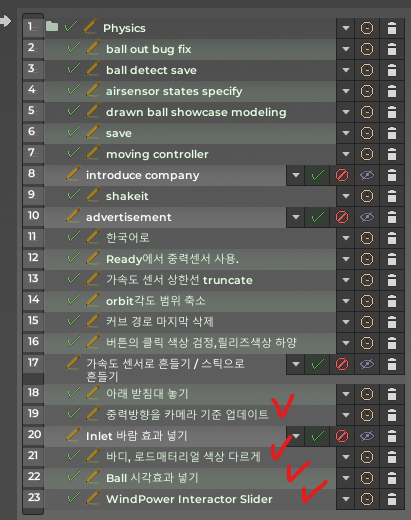
위의 테스트를 거쳐 받은 피드백을 가지고 아래와 같이 몇 가지를 고치기로 했다.
버튼의 클릭 여부에 따라 색상을 검정과 하양으로 바꾸기 위해 toggle 스크립트를 수정했다.
1
2
3
4
5
6
7
8
9
10
11
12
13
14
15
16
17
18
19
20
21
22
23
24
25
26
27
28
29
30
31
32
33
34
35
36
37
38
39
40
41
using TMPro;
using UnityEngine;
using UnityEngine.UI;

namespace QUIRKAGAMES.Lottery
{
    public class ToggleDelegateEventBase : MonoBehaviour
    {
        protected Toggle MToggle;
        public TMP_Text textMeshPro; // Reference to your TMP Text component
        public Color textColorOn = Color.white; // Add this line
        public Color textColorOff = Color.black; // Add this line

        protected virtual void Awake()
        {
            //Fetch the Toggle GameObject
            MToggle = GetComponent();
            //Add listener for when the state of the Toggle changes, to take action
            MToggle.onValueChanged.AddListener(delegate { ToggleValueChanged(MToggle); });
        }

        // Output the new state of the Toggle into Text
        protected virtual void ToggleValueChanged(Toggle change)
        {
            if (MToggle.isOn)
            {
                // Change the TMP Text color to white
                textMeshPro.color = textColorOn;

                // Additional logic in derived classes
            }
            else
            {
                // Change the TMP Text color to black
                textMeshPro.color = textColorOff;

                // Additional logic in derived classes
            }
        }
    }
}
1
2
3
4
5
6
namespace QUIRKAGAMES.Lottery
{
    public class ToggleDelegateEvent_Drawing : ToggleDelegateEventBase
    {
    }
}
이제 새롭게 바뀐 토글 인스펙터. 토글 여부에 따라 결정되는 Text의 색상을 지정할 수 있다.
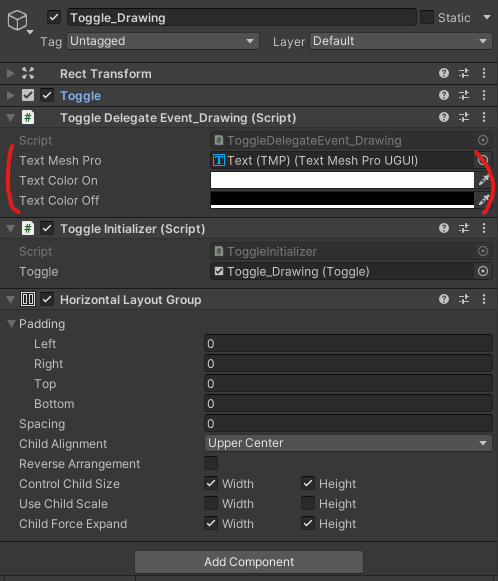
기본 기능에 추가 기능이 필요하면 다음처럼 오버라이딩 했다.
1
2
3
4
5
6
7
8
9
10
11
12
13
14
15
16
17
18
19
20
21
22
23
24
25
26
27
28
29
30
31
using UnityEngine.UI;

namespace QUIRKAGAMES.Lottery
{
    public class ToggleDelegateEvent_Ready : ToggleDelegateEventBase
    {
        public ProgramManager programManager;

        protected override void Awake()
        {
            // Fetch the Toggle GameObject
            MToggle = GetComponent();
            // Add listener for when the state of the Toggle changes, to take action
            MToggle.onValueChanged.AddListener(delegate {
                ToggleValueChanged(MToggle);
            });
        }

        //Output the new state of the Toggle into Text
        protected override void ToggleValueChanged(Toggle change)
        {
            base.ToggleValueChanged(change);
            if (MToggle.isOn)
            {
                programManager.SetReady();
            }
        }
    }
}
UI는 다음과 같다. '환경설정' 항목은 깔끔함을 위해 삭제했다. 그리고 전부 한글로 바꿨다.
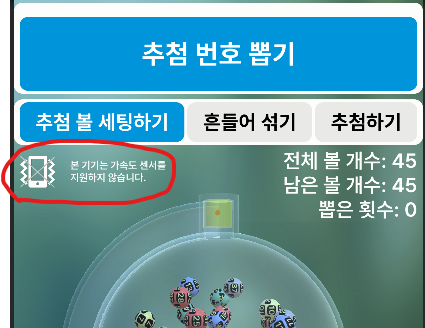
가속도 센서를 지원하지 않는 데스크톱이나 특수한 핸드폰의 경우를 고려해서 다음과 같이 안내문도 추가했다.
그리고 스마트폰을 흔들때 기존 방식은 일정 임계점을 넘는 세기의 흔드는 움직임에 반응하도록 되어 있었고, 중력 방향은 업데이트를 하지 않았었다. 그렇게 되고 나니 사용자의 입장에서 상호작용을 이해하기 어렵다는 피드백이 있었다. 그래서 중력 방향을 디바이스 센서의 값을 받아 업데이트를 하려고 했는데, 알고 보니 가속도 센서가 개념적인 중력 센서의 역할마저도 하고 있었다. 그래서 가속도 센서 값을 그대로 받아와서 그 벡터값으로 시뮬레이션의 중력 방향을 업데이트 해주기로 했다. 코드가 한결 간결해졌고, 사용자의 입장에서도 앱을 다루기 쉬워졌다.
1
2
3
4
5
6
7
8
9
10
11
12
13
14
15
16
17
18
19
20
21
22
23
24
25
26
27
28
29
30
31
32
33
34
35
36
37
38
39
40
41
42
43
44
45
46
47
48
49
50
51
52
53
54
55
56
57
58
59
60
61
62
63
64
65
66
67
68
69
70
71
using UnityEngine;
using System.Collections.Generic;
using UnityEngine.Serialization;

namespace QUIRKAGAMES.Lottery
{
    public class AccelerometerShakeDetection : MonoBehaviour
    {
        private Vector3 _deviceAcceleration;
        public GameObject iconShakeO;
        public GameObject iconShakeX;

        public AirSensorManager airSensorManager;

        // Adjust the fixed update rate by changing the time interval
        private readonly float _fixedUpdateInterval = 0.05f; // Change this value to your desired time interval
        private float _timeSinceLastFixedUpdate = 0.0f;

        private void Start()
        {
            // Check if the device supports accelerometer input
            if (SystemInfo.supportsAccelerometer)
            {
                // Enable the accelerometer
                iconShakeO.SetActive(true);
                iconShakeX.SetActive(false);

            }
            else
            {
                // Accelerometer input is not supported on this device
                Debug.LogWarning("Accelerometer not supported on this device.");
                iconShakeO.SetActive(false);
                iconShakeX.SetActive(true);
            }
        }

        private void FixedUpdate()
        {
            // Update the time since the last FixedUpdate
            _timeSinceLastFixedUpdate += Time.fixedDeltaTime;

            // Check if it's time to run FixedUpdate based on the desired interval
            if (_timeSinceLastFixedUpdate >= _fixedUpdateInterval)
            {
                // Call FixedUpdate
                SlowFixedUpdate();

                // Reset the time since the last FixedUpdate
                _timeSinceLastFixedUpdate = 0.0f;
            }
        }

        private void SlowFixedUpdate()
        {
            // Check if the device supports accelerometer input
            if (SystemInfo.supportsAccelerometer)
            {
                // Get the current device acceleration
                _deviceAcceleration = Input.acceleration;

                // multiply -1 to the z axis
                _deviceAcceleration.z *= -1;

                // Set the gravity sensor vector to the normalized device acceleration
                airSensorManager.SetSensorVector(Enums.SensorIDEnum.AirSensor_gravity, _deviceAcceleration.normalized);
            }
        }
    }
}
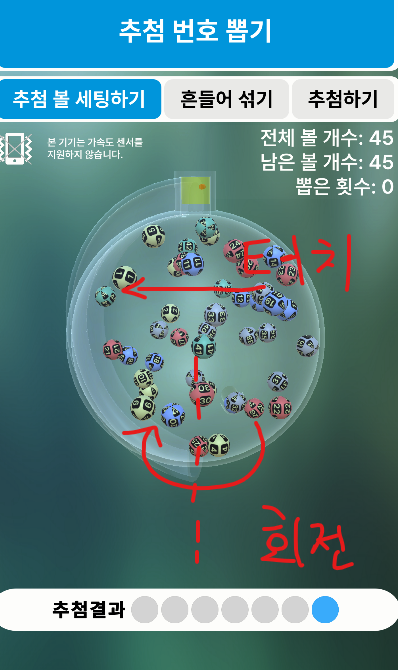
Orbit Camera Controller 도 상호작용을 조금 수정했다. 사용자가 터치를 하면 투명용기의 겉부분을 밀어 돌리는 방식으로 상호작용할 수 있도록 방향을 맞추었다.
다음은 지금까지의 전체 hirarchy
그러고 다시 테스트를 함. https://youtu.be/Hvf9lwgPVdo
[영상]
사용자 경험 개선
Very Huge Updates https://youtu.be/XaO4EyDbshs
[영상]
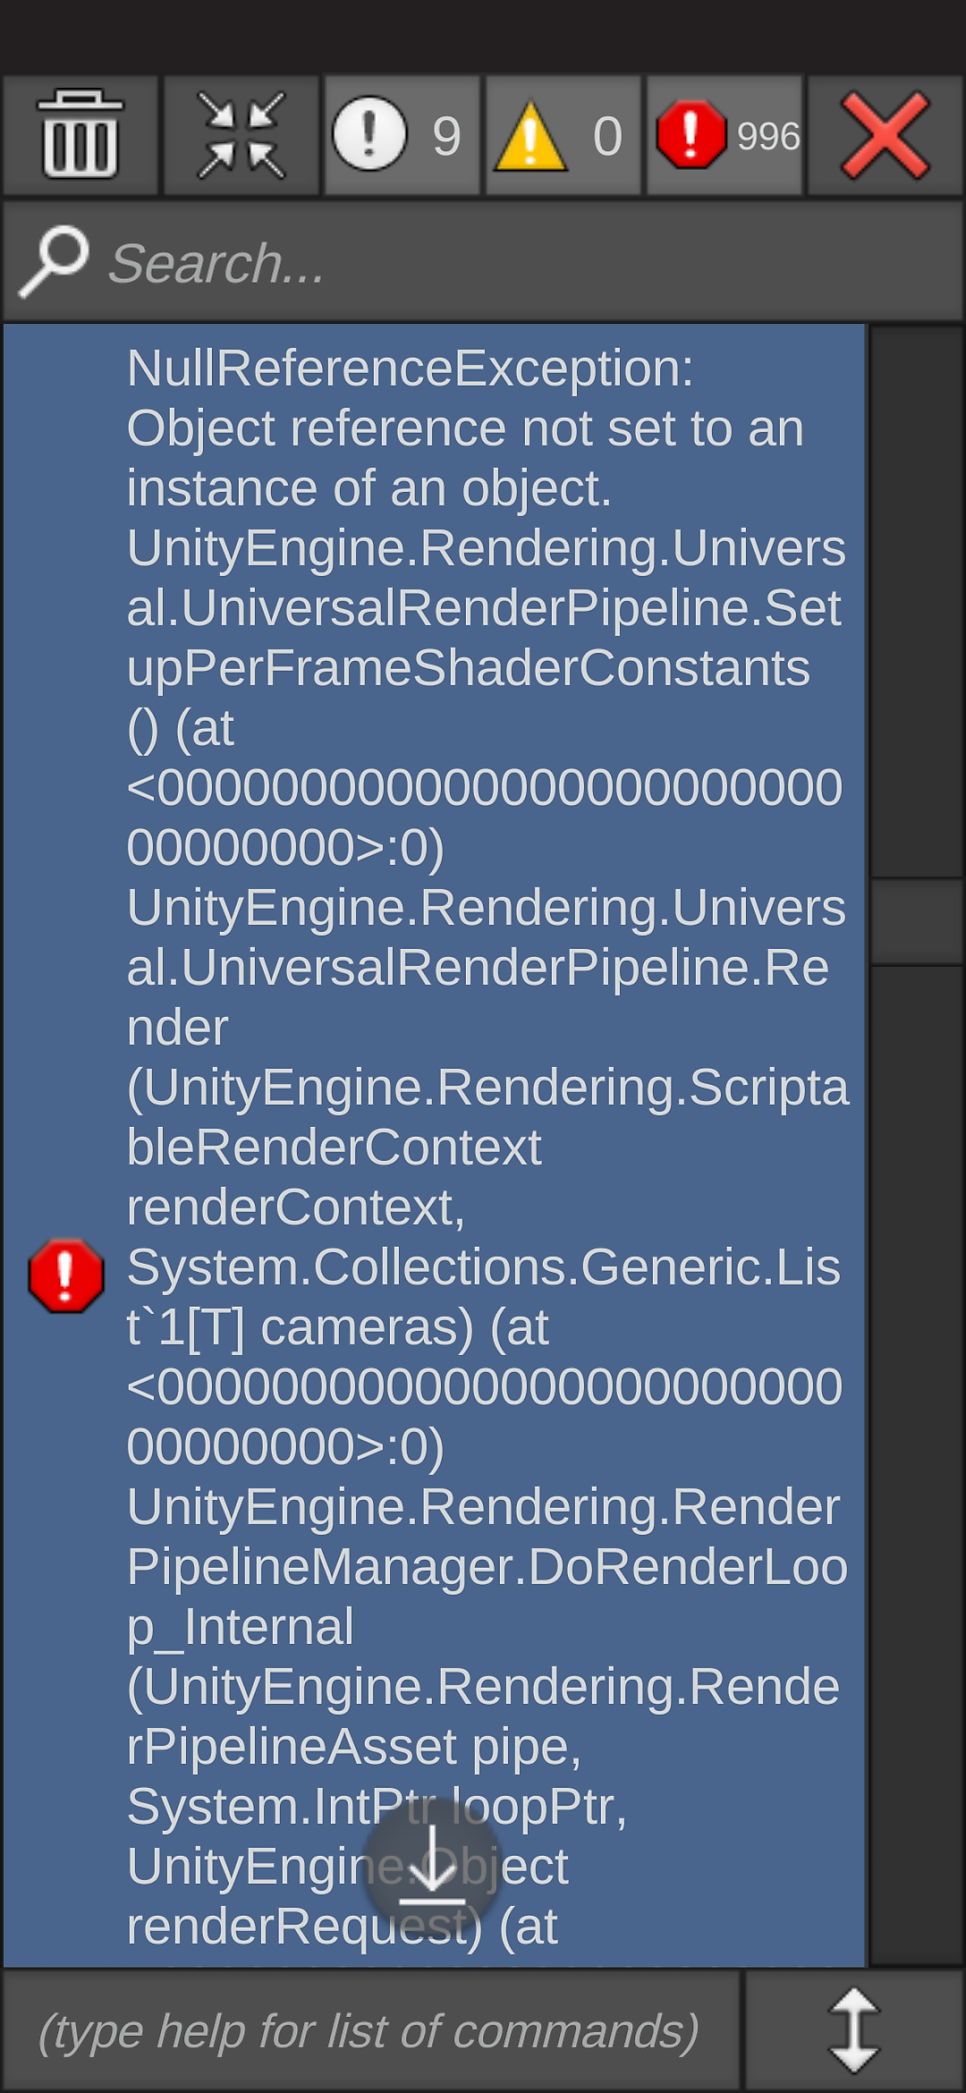
어제 새벽(9.25 새벽)에 위 영상 버전을 빌드해서 모바일에 설치했는데 다음과 같은 에러가 떴었다. URP관련한 에러였는데, 이거 때문에 기능을 전부 다 지워가면서 롤백하고 URP 설정 건드려서 계속 다시 빌드했는데 안됬었다. 아예 URP를 지우고 SRP로 빌드해서 될 때까지 했다. 처음에는 SRP로 도로 바꿨는데도 에러가 나길래 약간 맨붕했었다. 그러다가 갑자기 되기 시작했는데ㅠㅠ 왜 해결된지는 잘 모르겠다. 이 에러는 인터넷에 쳐도 안나오는 에러다. ㅎㅎ 개고생. 그래도 하나씩 심증가는데로 다 건드렸었는데 그러다가 뭔가가 고쳐졌나보다. 명백하게 건드린 건 없었던 것 같다. 하나 건드려보고 안되면 돌리고 이런식으로 했던건데 되는 순간 돌려서 해도 되어서 .. ㅎㅎ
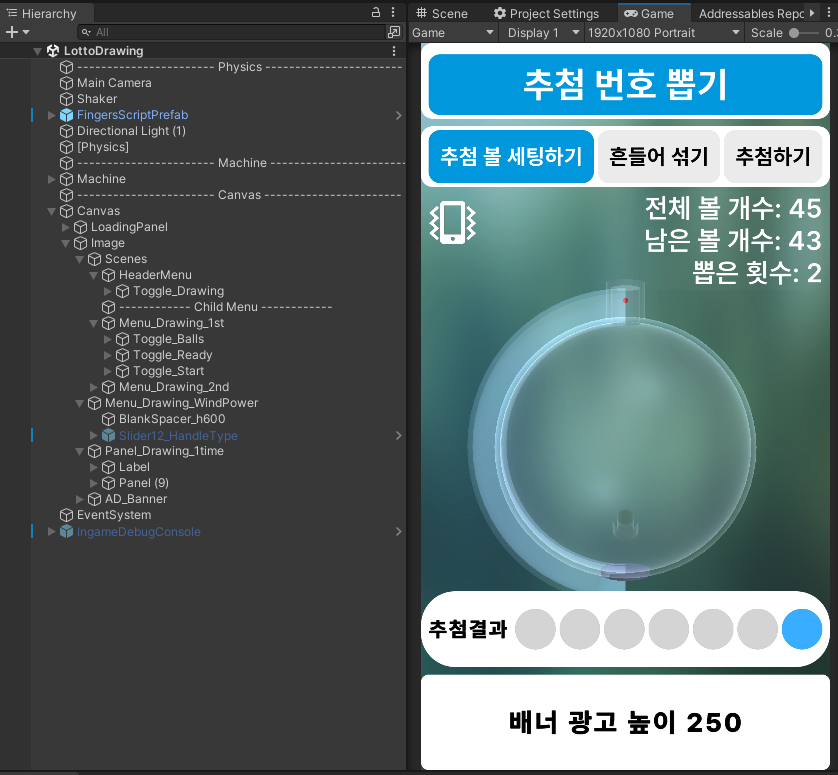
자고 일어나서 다시 하다가 됬을 때 매우 기뻤다. 모바일에서 슬라이더가 터치가 잘 안됬다. 슬라이더 핸들이 없거나 너무 작아서 터치가 안되는 것 같아서 핸들이 있는 모양으로 다시 만들었다. 그리고 UI레이아웃을 바꿨다. 위, 아래, 그리고 중간이 전부 화면에 나오도록 맞추어야 한다. 그리고 배너 광고의 높이는 고정 250으로 한다.
Better UI(fany Slider, scalable layout) https://youtu.be/f2GBmA0GyPo
[영상]
Fancy한 위의 slider를 만드는 방법은, Empty와 Fill 을 vertical layout group을 통해 일괄적으로 같은 크기로 세팅한 다음, Fill에서는 vertical layout group을 다시 선택 해제하자. 그 대신 마스크, 즉 Rect Mask 2D를 턴온 해서 사용하면 런타임에서 마스크를 벗어나는 부분은 자동으로 지워지니까 영상과 같은 슬라이더 효과가 만들어진다.
모바일 테스트 영상. https://youtu.be/vf8eyN4ivUA
[영상]
용량은 약 60메가바이트.

이제 광고만 넣으면 되려나..?
9.26 바람효과 추가. 업데이트 https://youtu.be/2Xlx2phPtME
[영상]
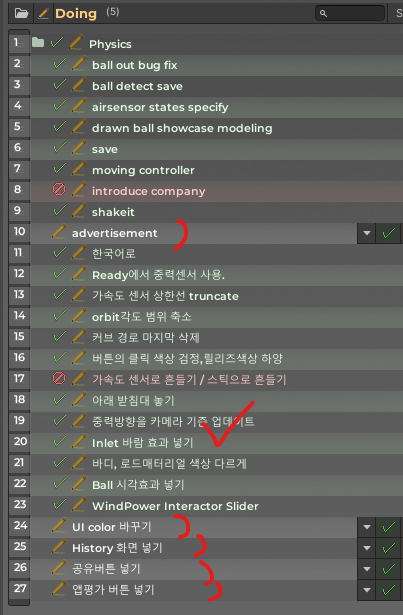
- History 장면 넣기
- UI 버튼 색 바꾸기
- 스크린샷 공유버튼 넣기, 앱평가 버튼 넣기
- 배너 광고 넣기
- 구글 Achivement 넣기?
[영상]
넣은 기능: 종료기능, 세이브로드기능, 히스토리장면, 삭제버튼팝업 등
아직 안한 개선: 배너광고 넣기, UI색상그라디언트 넣기, 공유버튼 팝업과 기능 넣기, 앱평가 버튼과 팝업 넣기.
+추가) 히스토리의 목록 글자가 너무 작아서 잘 안보이는 문제가 있음. 그래서 팝업창을 띄워서 숫자를 크게 볼 수 있도록 함. https://youtu.be/ZbYQ7-mpuWY
[영상]
machine
history
그런데 다음주 10.7에 LG CNS데이터분석테스트 있어서 파이썬 데이터분석 빨리 인강 들어서 배워야한다. 개발 잠깐 쉬자.
쉬고 데이터분석공부해야하는데 손에 잘 안잡힌다. 강의 4시간 정도 들었는데.. 그래서 앱을 더 업그레이드 했다.
0929업데이트: LottoSheet 추가. 공 6개로 수정. https://youtu.be/qPz7PinCEW8
[영상]
아.. 근데 영상 다시 보니 에러가 있네요. 로또용지에 마킹된 표시가 지워지지 않았군요. 해결하러 가봐야겠습니다.ㅎㅎ
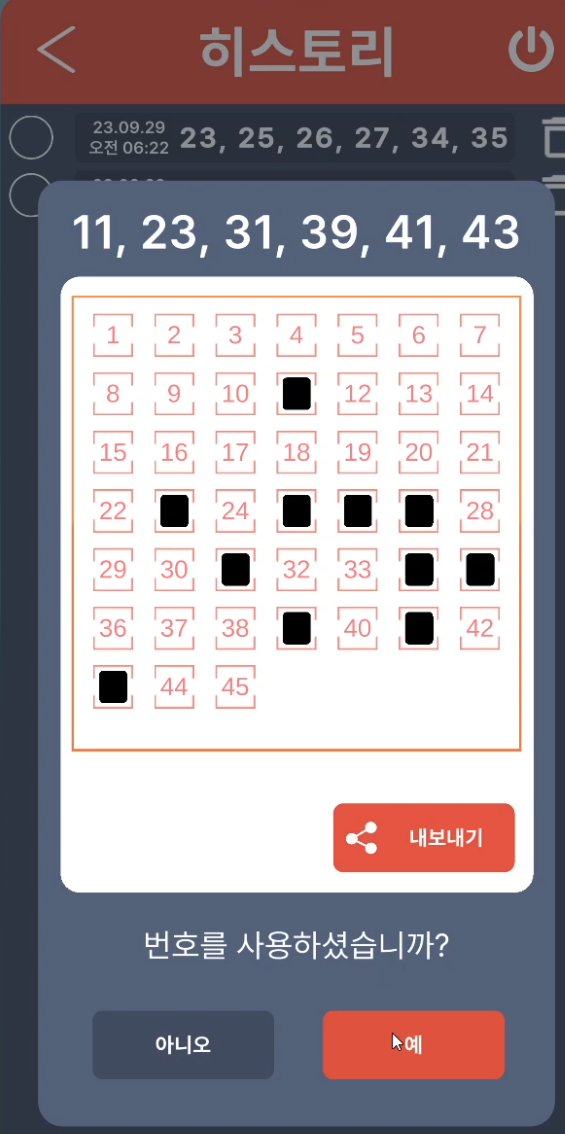
마킹 오류 해결. 정말 간단히 해결했다. if 문에 else만 넣어서 해결.ㅋ https://youtu.be/yDwGbPyCNgw
[영상]
요새 데이터분석 강의듣고 있다. 그런데 너무 따분해서 앱만들기로 돌아왔다. 놀고 싶은 생각을 물리치려고 대신 앱 만들기를 하는 거라고 합리화하면서, 그래도 속으론 일요일(4일 뒤)에 있을 데이터분석 시험 공부를 안하고 있다는 불안과 두려움에 떨면서… 앱을 만들었다..
크게 진도를 낸 것은 '광고넣기'다. 애드몹과 유니티애즈를 사용했고 mediataion은 admob에서 했다. 일단 배너만 넣었고, 전면광고와 리워드 광고도 넣을 예정이다. 배너는 단가가 다른 광고의 1/10 수준이라서 필히 다른 광고도 잘 넣어야 한다. 일단 한 것까지 영상으로 기록해둔다.
10.5 수요일 오전 2시 https://youtu.be/ZftQoVqZHLY
[영상]
앱 개시를 위한 개인 정보 약관 작성. https://sites.google.com/view/quirkagames-privacy-policy/%ED%99%88
무료 홈페이지 개설했다. aws 웹서버는 없앴다. 서버 비용 찔끔찔끔 나가는거 싫어서 없앴다. https://www.quirkagames.com/
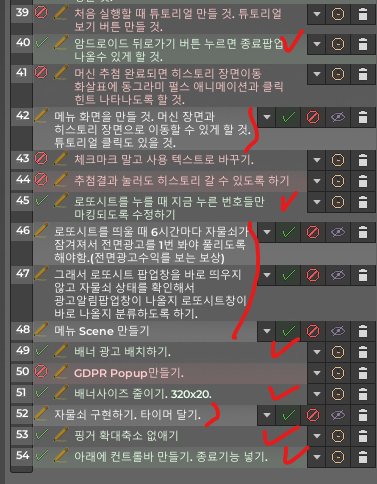
체크 표시는 한것, 우괄호 표시는 할 것.
광고 프리 타이머 기능을 구현은 해놓았는데 버튼에 연결을 안해놓았다. 버튼을 어디다가 둘 지 고민이다. 메뉴씬을 하나 더 만들어서 거기다가 넣는 것도 고려사항이다.
10.7토요일
앱 만들때는 시간가는줄 모른다. 신기하다.
아래는 릴리즈 27까지 업로드한 앱이다. 광고를 꽤나 신경써서 넣었다. 로또 홈페이지에서 지난회차 당첨번호도 html로 받아서 파싱해서 사용했다. 이 정도면 이제 손에서 놔줄 때가 슬슬 된 거 같다. 큐알코드로 당첨번호도 확인하면 좋기는 한데 아무리봐도 끝까지 완성하지 않고 지금 80퍼 완성된 시점에 시장에 내놓는게 더 옳은 선택같다. https://youtu.be/fiTG7ivnZ_Y
[영상]
곧 공개 테스트로 옮기고 광고 열어야될거같다.
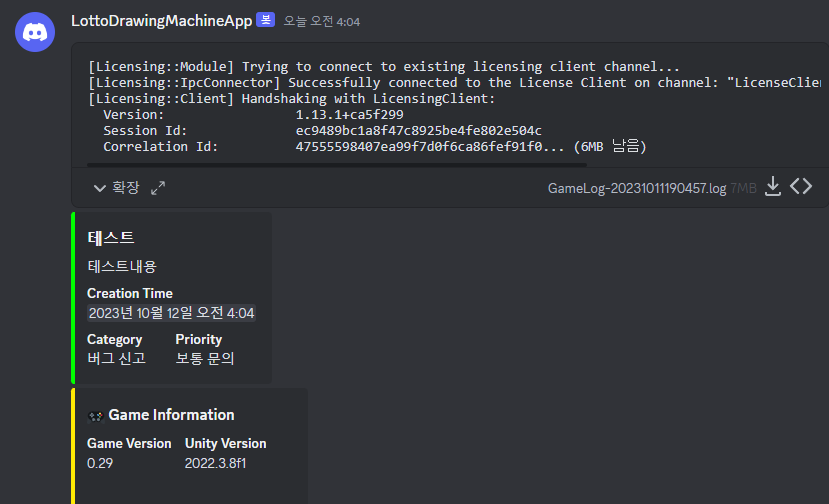
피드백 기능 만들었음. 디스코드로. https://youtu.be/Ne917sDt6jg
[영상]
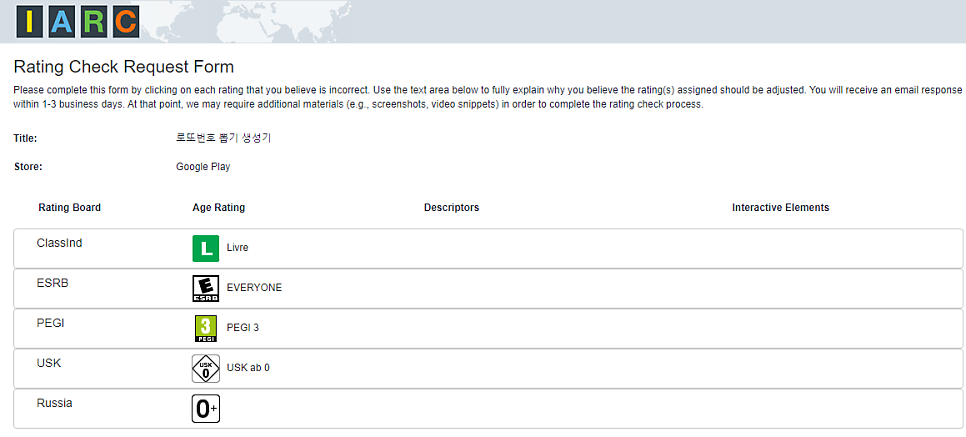
https://www.globalratings.com/about.aspx#participants
About the International Age Rating Coalition | IARC About IARC Administered by many of the world's game rating authorities, the International Age Rating Coalition (IARC) provides a globally streamlined age classification process for digital games and mobile apps, helping to ensure that today's digital consumers have consistent access to established a… About IARC Administered by many of the world's game rating authorities, the International Age Rating Coalition (IARC) provides a globally streamlined age classification process for digital games and mobile apps, helping to ensure that today's digital consumers have consistent access to established a…
10/30 앱 출시!!!! https://play.google.com/store/apps/details?id=com.QUIRKAGAMES.SpecialLotto645
로또번호 뽑기 생성기 - 에어브레스 - Apps on Google Play Lotto number generator that draws directly by shaking Lotto number generator that draws directly by shaking
11/04 업데이트
릴리즈42