Flutter Simple 그림판 (3)
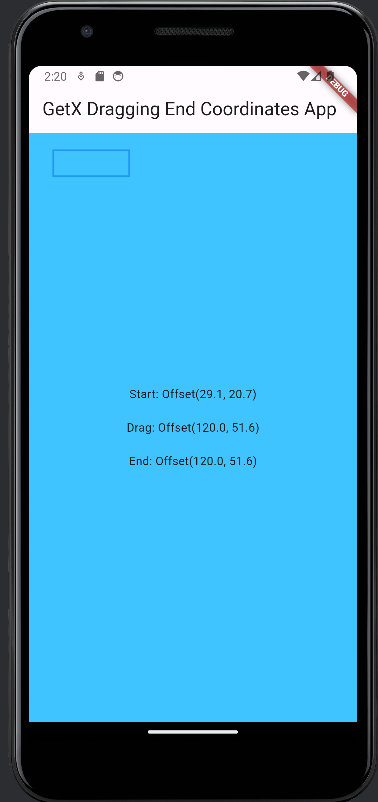
GetBuilder를 사용해서 좌표를 가지고 있는 상태 변수를 가져왔다.
그 좌표를 CustomPainter로 만든 RectanglePainter에 넣어서 사각형을 그리는 위젯을 만들었고,
그 위젯을 body-stack에 넣었다.
그리고 탭컨트롤러에 GetxController의 update()를 호출해서 UI를 원하는 때마다 업데이트하도록 호출하였다.
좌표는 globalPosition이 아닌 localPosition으로 해야 appbar크기와 무관하게 body영역 안에서의 좌표를 얻을 수 있다.
1
2
3
4
5
6
7
8
9
10
11
12
13
14
15
16
17
18
19
20
21
22
23
24
25
26
27
28
29
30
31
32
33
34
35
36
37
38
39
40
41
42
43
44
45
46
47
48
49
50
51
52
53
54
55
56
57
58
59
60
61
62
63
64
65
66
67
68
69
70
71
72
73
74
75
76
77
78
79
80
81
82
83
84
85
86
87
88
89
90
91
92
93
94
95
96
97
98
99
100
101
102
103
104
105
106
107
108
109
110
111
112
113
114
115
116
117
118
119
120
121
122
123
124
125
126
127
128
129
130
131
132
133
134
135
136
137
138
139
140
141
142
143
144
145
146
147
148
149
150
import 'package:flutter/material.dart';
import 'package:get/get.dart'; // Ensure GetX is still used for dependency injection.

class TapController extends GetxController {
  var startStr = 'Tap Somewhere'.obs;
  var endStr = ''.obs;
  var dragStr = ''.obs; // Add this line for drag coordinates
  bool isDrawing = false;
  // starting point
  Offset? start;
  // dragging point
  Offset? drag;
  // ending point
  Offset? end;

  void updateUI() {
    // Calls GetxController's update method to update the UI
    update();
  }

  void reset() {
    start = null;
    drag = null;
    end = null;
    isDrawing = false;
    updateUI();
  }

  void notifyEnd() {
    isDrawing = false;
    updateUI();
  }

  // Add this method for updating drag coordinates
  void updateDragCoordinates(Offset newCoordinates) {
    if (!isDrawing) {
      // If the user is not dragging, then the current drag coordinates are the starting point
      updateStartingPoint(newCoordinates);
    }
    // Update the drag coordinates
    updateDragPoint(newCoordinates);

    isDrawing = true;
  }

  void updateStartingPoint(Offset newStart) {
    startStr.value = newStart.toString();
    start = newStart;
    updateUI();
  }
  void updateDragPoint(Offset newDrag) {
    dragStr.value = newDrag.toString();
    drag = newDrag;
    updateUI();
  }
  void updateEndingPoint(Offset newEnd) {
    endStr.value = newEnd.toString();
    end = newEnd;
    updateUI();
  }
}

void main() {
  runApp(MyApp());
}
class MyApp extends StatelessWidget {
  @override
  Widget build(BuildContext context) {
    final TapController tapController = Get.put(TapController());

    return MaterialApp(
      home: Scaffold(
        appBar: AppBar(
          title: Text('GetX Dragging End Coordinates App'),
        ),
        body: GestureDetector(
          onTapDown: (TapDownDetails details) {

          },
          onPanUpdate: (DragUpdateDetails details) {
            // Keep updating the drag coordinates and the end position as the user drags
            tapController.updateDragCoordinates(details.localPosition);
            tapController.updateEndingPoint(details.localPosition); // 마지막 위치를 업데이트합니다.
          },
          onPanEnd: (DragEndDetails details) {
            // When the user stops dragging, notify the controller
            tapController.notifyEnd();
          },

          child: Stack(
            children: [
              Container(
                color: Colors.lightBlueAccent,
                alignment: Alignment.center,
                child: GetBuilder(
                  builder: (_) => Column(
                    mainAxisSize: MainAxisSize.min,
                    children: [
                      Text("Start: ${_.startStr.value}"),
                      SizedBox(height: 20),
                      Text("Drag: ${_.dragStr.value}"),
                      SizedBox(height: 20),
                      Text("End: ${_.endStr.value}"),
                    ],
                  ),
                ),
              ),
              GetBuilder(
                builder: (_) {
                  final start = _.start;
                  final end = _.end;
                  print('start: $start, end: $end');
                  if (start != null && end != null) {
                    final rect = Rect.fromPoints(start, end);
                    return CustomPaint(
                      painter: RectanglePainter(rect: rect),
                      child: Container(),
                    );
                  } else {
                    return SizedBox.shrink();
                  }
                },
              ),
            ],
          ),
        ),
      ),
    );
  }
}

class RectanglePainter extends CustomPainter {
  final Rect? rect;
  RectanglePainter({this.rect});

  @override
  void paint(Canvas canvas, Size size) {
    if (rect != null) {
      final paint = Paint()
        ..color = Colors.blue
        ..style = PaintingStyle.stroke
        ..strokeWidth = 2.0;
      canvas.drawRect(rect!, paint);
    }
  }

  @override
  bool shouldRepaint(covariant RectanglePainter oldDelegate) => true;
}
그린 사각형 크기 정보를 Get.to()를 사용해서 새로운 스크린으로 넘겨주기.
1
2
3
4
5
6
7
8
9
10
11
12
          onPanEnd: (DragEndDetails details) {
            // When the user stops dragging, notify the controller
            tapController.notifyEnd();

            if (tapController.start != null && tapController.end != null) {
              // Calculate the width and height of the rectangle
              final width = (tapController.end!.dx - tapController.start!.dx).abs();
              final height = (tapController.end!.dy - tapController.start!.dy).abs();
              // Navigate to the SquareDetailsScreen and pass the width and height as arguments
              Get.to(() => SquareDetailsScreen(width: width, height: height));
            }
          },
1
2
3
4
5
6
7
8
9
10
11
12
13
14
15
16
17
18
19
20
class SquareDetailsScreen extends StatelessWidget {
  final double width;
  final double height;

  const SquareDetailsScreen({Key? key, required this.width, required this.height})
      : super(key: key);

  @override
  Widget build(BuildContext context) {
    return Scaffold(
      appBar: AppBar(
        title: Text('Square Details'),
      ),
      body: Center(
        child: Text('Width: $width, Height: $height'),
      ),
    );
  }
}
[영상]
이 기사는 저작권자의 CC BY 4.0 라이센스를 따릅니다.