Windows에서 쓰던 외장하드를 Ubuntu에 나눠쓰기 + 주의사항
저는 Windows에 연결해서 사진 백업용으로 쓰던 3.6tb HDD가 있습니다.
요번에 Ubuntu-server에 Immich 사진 서버를 만들면서 서버컴퓨터에 항시 HDD를 연결해두고 사용하고자 알아보았습니다.
Windows가 사용할 수 있는 파일시스템은 ntfs 포맷의 저장소입니다. 반면, Ubuntu는 ext4 에 최적화되어있죠. 그래서 이미 사용 중인 1.6tb보다 여유있게 2tb를 윈도우에게 주고, 나머지 약 1.6tb를 우분투에게 주기로 하였습니다.
외장하드를 서버컴에 연결합니다.
(링크)tmux에 대해 모르시는 분들은 반드시 먼저 필독!
1
tmux
1
2
3
4
5
6
7
8
9
10
11
12
13
14
15
16
17
18
19
20
21
22
23
24
25
26
27
28
29
30
31
32
33
34
35
36
37
38
39
40
41
42
43
44
45
46
47
48
49
50
51
52
53
54
55
56
57
58
59
60
61
62
63
64
65
66
67
68
69
70
71
72
73
74
75
76
# 0. 연결된 모든 디스크와 파티션을 확인
lsblk -o NAME,SIZE,FSTYPE,MOUNTPOINT,LABEL

>>devram@my-ubuntu-server:/$ lsblk -o NAME,SIZE,FSTYPE,MOUNTPOINT,LABEL
NAME                       SIZE FSTYPE      MOUNTPOIN LABEL
sda                        3.6T
├─sda1                      16M
└─sda2                     3.6T ntfs                  YK개인HHD
nvme0n1                    1.9T
├─nvme0n1p1                  1G vfat        /boot/efi
├─nvme0n1p2                  2G ext4        /boot
└─nvme0n1p3                1.9T LVM2_member
  └─ubuntu--vg-ubuntu--lv  100G ext4        /


# 1. 현재 ntfs포맷 저장소의 크기는 얼마이고, 얼마까지 줄일 수 있는지 확인
sudo ntfsresize --info /dev/sda2

>> devram@my-ubuntu-server:/$ sudo ntfsresize --info /dev/sda2
ntfsresize v2022.10.3 (libntfs-3g)
Device name        : /dev/sda2
NTFS volume version: 3.1
Cluster size       : 4096 bytes
Current volume size: 4000768324096 bytes (4000769 MB)
Current device size: 4000768327680 bytes (4000769 MB)
Checking filesystem consistency ...
100.00 percent completed
Accounting clusters ...
Space in use       : 1614346 MB (40.4%)
Collecting resizing constraints ...
You might resize at 1614345388032 bytes or 1614346 MB (freeing 2386423 MB).
Please make a test run using both the -n and -s options before real resizing!


# 2. (선택) 시뮬레이션: 안정성 검토
sudo nftsresize -n -s 2000G /dev/

>> devram@my-ubuntu-server:/$ sudo ntfsresize -n -s 2000G /dev/sda2
ntfsresize v2022.10.3 (libntfs-3g)
Device name        : /dev/sda2
NTFS volume version: 3.1
Cluster size       : 4096 bytes
Current volume size: 4000768324096 bytes (4000769 MB)
Current device size: 4000768327680 bytes (4000769 MB)
New volume size    : 1999999996416 bytes (2000000 MB)
Checking filesystem consistency ...
100.00 percent completed
Accounting clusters ...
Space in use       : 1614346 MB (40.4%)
Collecting resizing constraints ...
Needed relocations : 141868010 (581092 MB)
Schedule chkdsk for NTFS consistency check at Windows boot time ...
Resetting $LogFile ... (this might take a while)
Relocating needed data ...
100.00 percent completed
Updating $BadClust file ...
Updating $Bitmap file ...
Updating Boot record ...
The read-only test run ended successfully.


# 3. 실제 파티션 크기 줄이기 (예: 2TB로): 시간이 10~30분 걸림
sudo ntfsresize --size 2000G /dev/sda2

# 3. # 그 줄인 내용을 반영하기 위해 parted로 파티션 테이블 수정
sudo parted /dev/sda
# print 확인 후 ↓
(parted) resizepart 2 2000GB
(parted) mkpart primary ext4 2000GB 3600GB
(parted) quit

# 4. 포맷 및 마운트
sudo mkfs.ext4 /dev/sda3
sudo mkdir -p /mnt/immich-photos
sudo mount /dev/sda3 /mnt/immich-photos
+주의)
저는 tmux 없이 했다가 도중에 언제 ssh가 끊길지 모르는 불안감 때문에(cursor terminal에서 연결한 ssh가 딴 작업 하다보면 자주 끊긴 전적이 있어서)
gpt의 말을 듣고 한 15분 뒤에 종료했습니다. (5%밖에 안되고 있었거든요.)
윈도우에서 리커버리 한번 해주고 다시 우분투로 돌아와서 하던 작업 다시 하면 된다고 했는데..
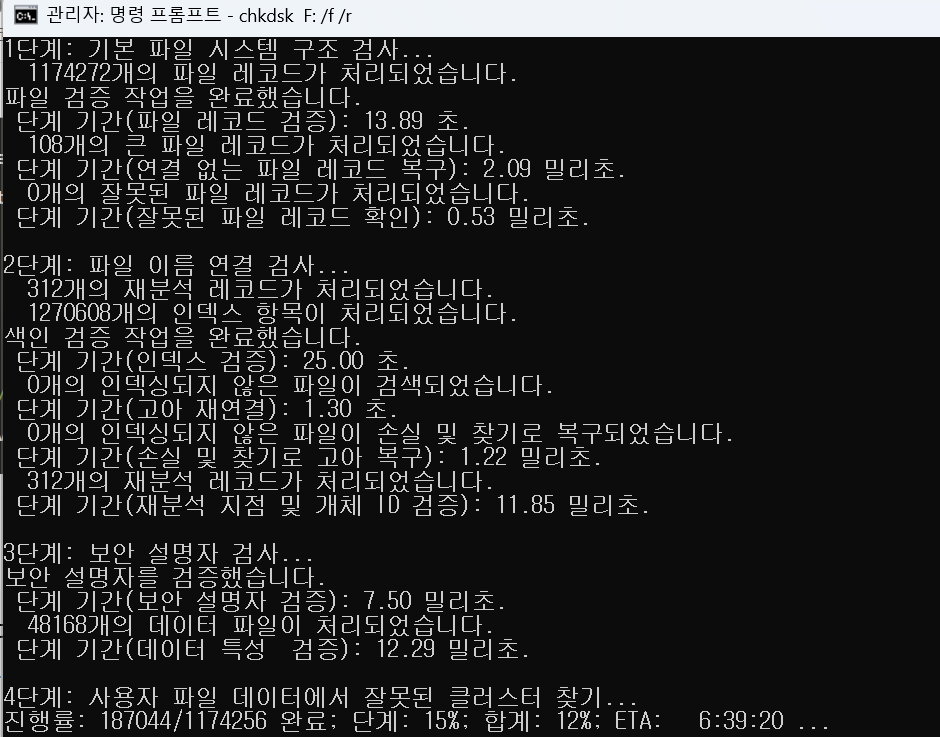
아 7시간을 이러고 있어야 합니다.ㅎㅎ
ㅠ.ㅠ
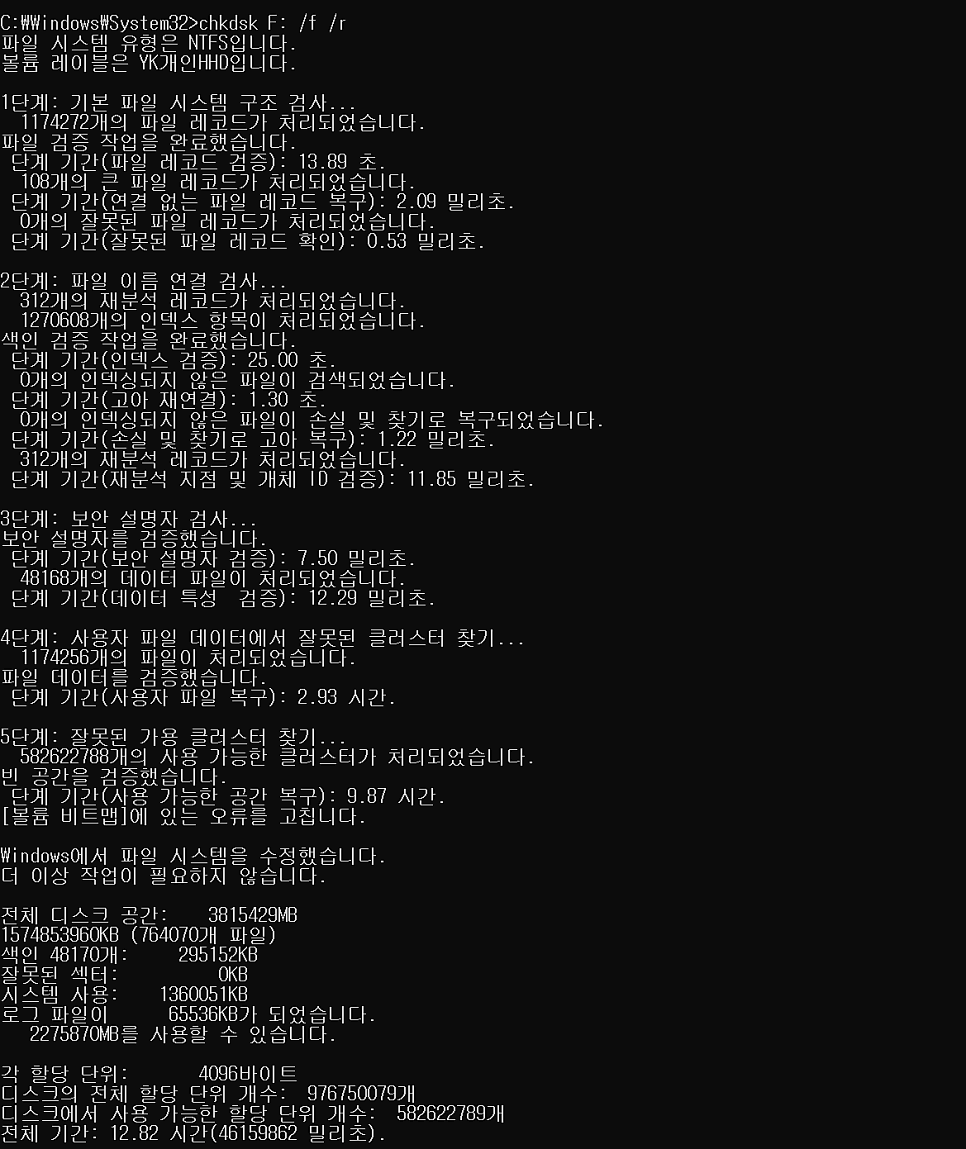
13시간 ㅋㅋ
다음 포스팅도 관심있으신 분들은 방문해주세요. https://blog.naver.com/devramyun/223887893331
[20240603] 구글 포토 대안 immich 서버 스크립트로 한번에 설치하기 + 외장hdd 마운트 + 백업 예약 https://youtu.be/3egB_koPsXk 이 설치 스크립트를 만들면서 시행착오를 겪었던 부분이 있습니다. 처음… https://youtu.be/3egB_koPsXk 이 설치 스크립트를 만들면서 시행착오를 겪었던 부분이 있습니다. 처음…