최신버전 mlAgent로 Conda환경에서 agent 학습시키기
#Unity, #mlAgent, #Release20, #Conda, #Training, #MicroKart, #노트북으로MLAgent훈련

안녕하세요, 오늘은 지난번 포스팅했던 mlAgent 최신버전을 설치해서 사전 훈련된 네트워크로 인퍼런스하는 것에 이어서 훈련을 진행해보겠습니다. 지난 포스팅은 아래와 같습니다. https://blog.naver.com/devramyun/222977148845
[20230106] 유니티 머신러닝 개발 ML Agents 최신 버전 학습 예제 실행 유니티에서는 ml-agent 패키지를 사용하는 머신러닝을 지원한다. 아래에 소개하는 ml-agent 패키지는 꾸준… 유니티에서는 ml-agent 패키지를 사용하는 머신러닝을 지원한다. 아래에 소개하는 ml-agent 패키지는 꾸준…
인공지능을 훈련시키려 하시는 분들은 아무래도 conda 가상환경이 편하실 것 같습니다. 그리고 최신 좋은 성능을 내는 모델들은 torch가 좀 많이 보여서 저처럼 pytorch를 tensorflow보다 선호하시는 분들이 계실 것 같아요. 그래서 인터넷을 찾아보았는데, 'mlAgent최신버전' +'Conda' +'torch', 이 조합을 다루는 포스팅이 안 보였습니다. 그래서 오늘은 그런 내용을 다루어보려고 합니다.
시작하겠습니다:)
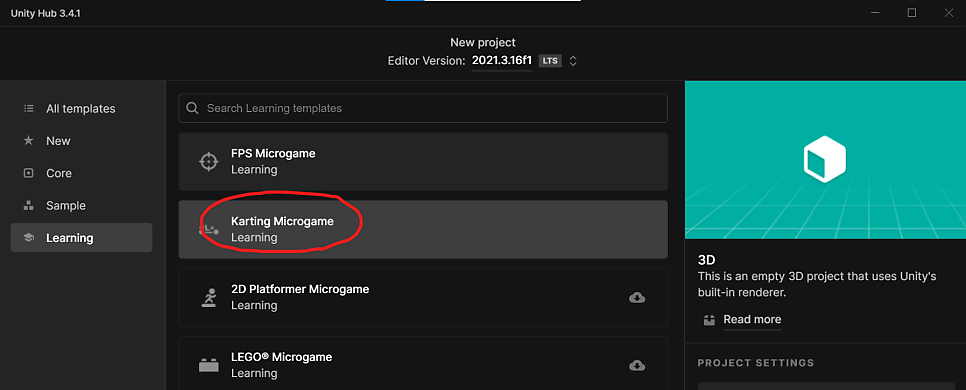
먼저 어떤 걸 훈련시킬지 정해야겠죠? 저는 Unity에서 기본으로 실행할 수 있는 예제 환경을 사용했습니다. 바로 'Kart Microgame'입니다.

프로젝트를 생성하면, 프로젝트의 다음 경로에 config.yaml파일이 있습니다. 바로 훈련에 필요한 hyperparameter를 선언하는 파일입니다.

그런데 여기있는 yaml은 오래된 버전에 적합해서 최신(2023년 3월 기준) 버전인 Release20 MlAgent로는 훈련을 할 수 없습니다. 아직 Unity에서 업데이트를 안해줬더라구요.. 바로 다음과 같이 생겼습니다.
1
2
3
4
5
6
7
8
9
10
11
12
13
14
15
16
17
18
19
20
21
22
23
24
25
26
27
28
29
30
31
32
33
34
35
36
37
38
39
40
41
#Outdated yaml
default:
    trainer: ppo
    batch_size: 1024
    beta: 5.0e-3
    buffer_size: 10240
    epsilon: 0.2
    hidden_units: 128
    lambd: 0.95
    learning_rate: 3.0e-4
    learning_rate_schedule: linear
    max_steps: 5.0e10
    memory_size: 256
    normalize: false
    num_epoch: 3
    num_layers: 2
    time_horizon: 64
    sequence_length: 64
    summary_freq: 1000
    use_recurrent: false
    vis_encode_type: simple
    reward_signals:
        extrinsic:
            strength: 1.0
            gamma: 0.99

ArcadeDriver:
    batch_size: 512
    learning_rate: 2.0e-4

4x4Driver:
    beta: 5.0e-4
    batch_size: 512

MuscleDriver:
    batch_size: 512

RoadsterDriver:
    batch_size: 512
    learning_rate: 2.0e-4
그래서 위 코드가 아닌 작동하는 코드를 우리가 새로 만들어줄텐데요, 여기에 config라는 폴더를 만들어줍시다. 그 다음 우리만의 myKartTraining.yaml 을 만들어줍시다.
1
(새로 작성)
그럼 이제 yaml을 작성해봅시다.
아래와 같이 하시면 됩니다. 제가 일일히 docs에서 옮겨서 작성했습니다.ㅎㅎ 블로그 포스팅에의 코드에는 글자수 제한이 있어서 아래 gist에 들어가시면 더 자세하게 주석도 작성해놨습니다. 깃에 많은 star 부탁드립니다! ^^
1
2
3
4
5
6
7
8
9
10
11
12
13
14
15
16
17
18
19
20
21
22
23
24
25
26
27
28
29
30
31
32
33
34
35
36
37
38
39
40
41
42
43
44
behaviors:
    ArcadeDriver:
    #---Common Essential Settings
        trainer_type: ppo
        #init_path: "{path}"
        keep_checkpoints: 5
        checkpoint_interval: 500000
        max_steps: 5.0e10
        time_horizon: 64
        summary_freq: 1000
        threaded: false
        hyperparameters:
            batch_size: 1024
            buffer_size: 10240
            learning_rate: 3.0e-4
            learning_rate_schedule: linear
        network_settings:
            normalize: false
            hidden_units: 128
            num_layers: 2
            vis_encode_type: simple
            conditioning_type: hyper
    #---Trainer Specific Settings
        #---PPO-specific Configurations
        hyperparameters:
            beta: 5.0e-3
            beta_schedule: linear
            epsilon: 0.2
            epsilon_schedule: linear
            lambd: 0.95
            num_epoch: 3
            shared_critic: false
    #---Reward Settings
        reward_signals:
            extrinsic:
                strength: 1.0
                gamma: 0.99
    #---Memory-enhanced Agents using Recurrent Neural Networks
        network_settings:
            memory:
                sequence_length: 64
                memory_size: 256
https://gist.github.com/southglory/32fae5c19e91cce576c3968c6f8aecfe
mlAgent_Release_20_KartTrain_by_Ramyun.yaml GitHub Gist: instantly share code, notes, and snippets. GitHub Gist: instantly share code, notes, and snippets.
+추가) 좀더 일반적인 용도로 template도 만들어봤습니다. private게시물이라서 아래 url 로만 보실 수 있습니다. 마찬가지로 star!부탁드려용 https://gist.github.com/southglory/a102af9417875d79f7842ebe0f2d9b99
mlAgent_Release_20_template_by_Ramyun.yaml GitHub Gist: instantly share code, notes, and snippets. GitHub Gist: instantly share code, notes, and snippets.
yaml을 작성했으니 이제 본격적으로 학습환경을 설치해보겠습니다. ML-Agent Release20을 설치하는 것은 지난 포스팅을 참조하시면 됩니다! https://blog.naver.com/devramyun/222977148845
[20230106] 유니티 머신러닝 개발 ML Agents 최신 버전 학습 예제 실행 유니티에서는 ml-agent 패키지를 사용하는 머신러닝을 지원한다. 아래에 소개하는 ml-agent 패키지는 꾸준… 유니티에서는 ml-agent 패키지를 사용하는 머신러닝을 지원한다. 아래에 소개하는 ml-agent 패키지는 꾸준…
바로 아래와 같이 되었다면 성공입니다.

그리고 Anaconda를 설치합니다. 만약 Anaconda가 없고 가볍게 사용하실 예정이라면 좀더 가벼운 miniconda를 추천합니다. https://docs.conda.io/en/latest/miniconda.html
Miniconda — conda documentation conda latest Conda Conda-build Miniconda System requirements Latest Miniconda Installer Links Windows installers macOS installers Linux installers Installing Other resources Help and support Contributing Conda license Docs » Miniconda Edit on GitHub Miniconda Miniconda is a free minimal installer fo… conda latest Conda Conda-build Miniconda System requirements Latest Miniconda Installer Links Windows installers macOS installers Linux installers Installing Other resources Help and support Contributing Conda license Docs » Miniconda Edit on GitHub Miniconda Miniconda is a free minimal installer fo…
아나콘다(혹은 미니콘다)를 설치하셨다면. base 가상환경에서 기본 콘다 버전을 업그레이드해줍니다.
1
conda update -n base -c defaults conda
그리고 mlagent에 필요한 가상환경을 만들어줍니다. python은 3.8이상이어야 하므로, 여기서는 3.9를 설치하겠습니다. 그리고 저는 노트북을 사용할 것이기 때문에 cuda가 아닌 cpu버전을 설치해줍니다.
1
2
3
4
conda create -n mlAgent20 python=3.9
conda activate mlAgent20
conda install pytorch torchvision torchaudio cpuonly -c pytorch
pip install mlagents==0.30.0
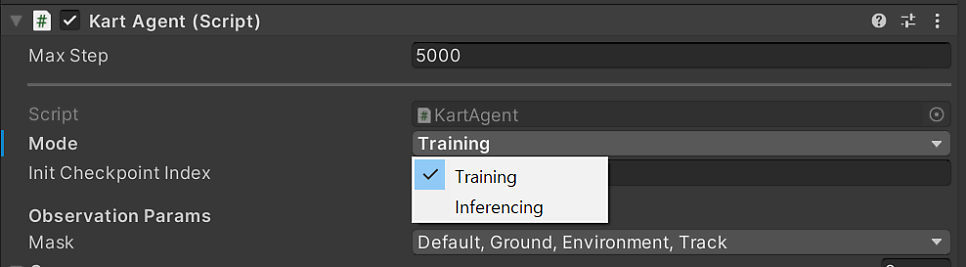
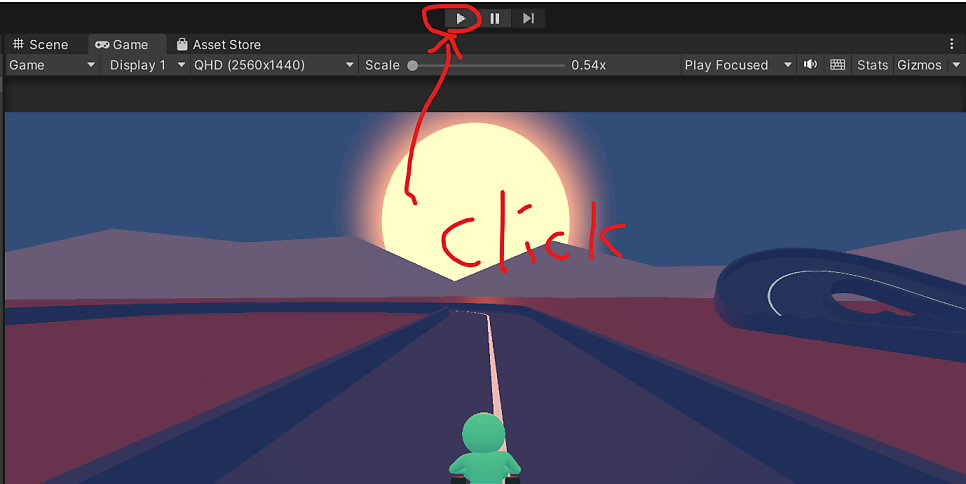
설치가 완료되셨나요? 훈련을 하기 위해서 Scene의 Agent에 있는 script를 train모드로 바꿔줍니다.
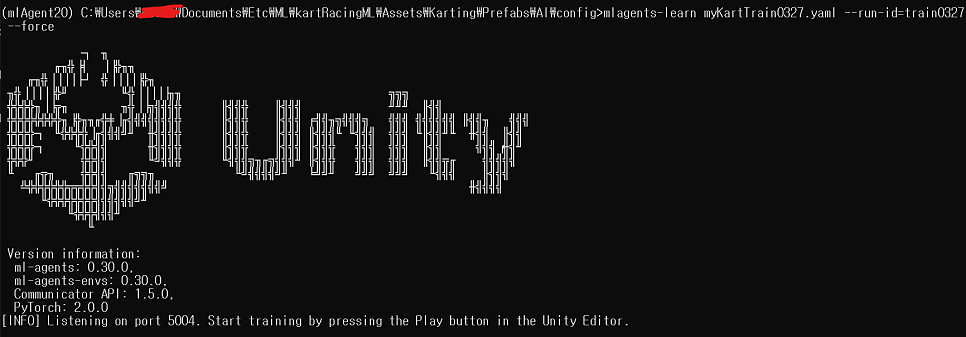
이제 아까 만든 config폴더에서 아나콘다 프롬프트를 열어서 다음 명령어를 입력하면 훈련을 할 수 있습니다.
1
2
cd {경로/config}
mlagents-learn {파일이름}.yaml --run-id={훈련이름} --force
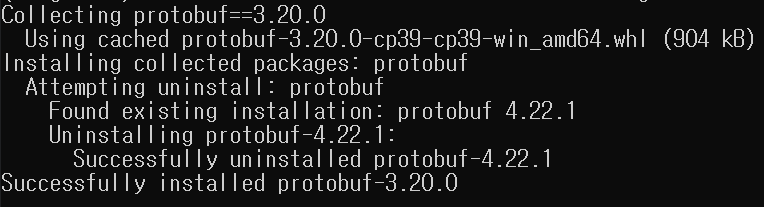
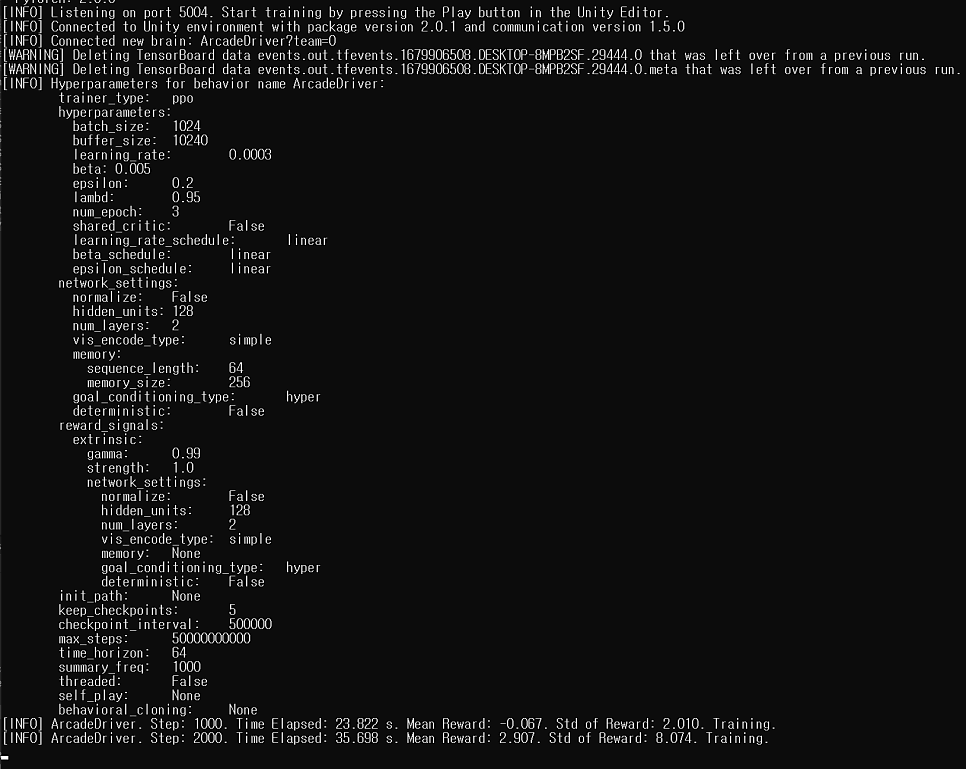
–force는 이전에 학습한 것이 있다면 무시하고 새로 덮어쓴다는 뜻입니다. 그런데 여기까지 잘 하셨다면, 저만 그러는 지는 모르지만 아래와 같이 설치 패키지가 부족하다고 에러가 출력될겁니다.

1
pip install protobuf==3.20.0
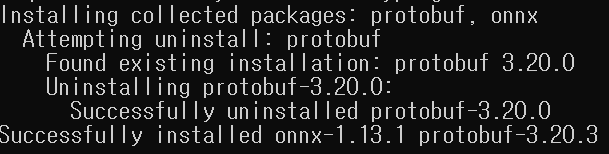
onnx도 설치해줍니다.

1
2
pip install onnx
부족한 모듈 설치가 완료되었으니 다시 mlagents-learn을 해봅시다.
[영상]
여기까지 따라오시느라 고생 많으셨습니다! 도움이 되셨다면, 공감버튼 눌러주시면 관련된 포스팅을 더 올리겠습니다.
감사합니다.

- https://github.com/Unity-Technologies/ml-agents/blob/release_20_docs/docs/Training-Configuration-File.md
- https://github.com/Unity-Technologies/ml-agents/tree/release_20_docs/docs
- https://blog.naver.com/devramyun/222977148845
- https://dev-youngil.tistory.com/6
- https://velog.io/@devseunggwan/Unity-ML-Agents-%EC%B2%98%EC%9D%8C-%EC%82%AC%EC%9A%A9%ED%95%98%EB%8A%94-%EC%82%AC%EB%9E%8C%EB%93%A4%EC%9D%84-%EC%9C%84%ED%95%9C-Starter